
How to Test Antenna SWR with a NanoVNA
Updated: June 2026. This guide explains how to test antenna SWR with a NanoVNA, including calibration, markers, reference planes, antenna tuning, Smith Chart basics, and common troubleshooting steps.
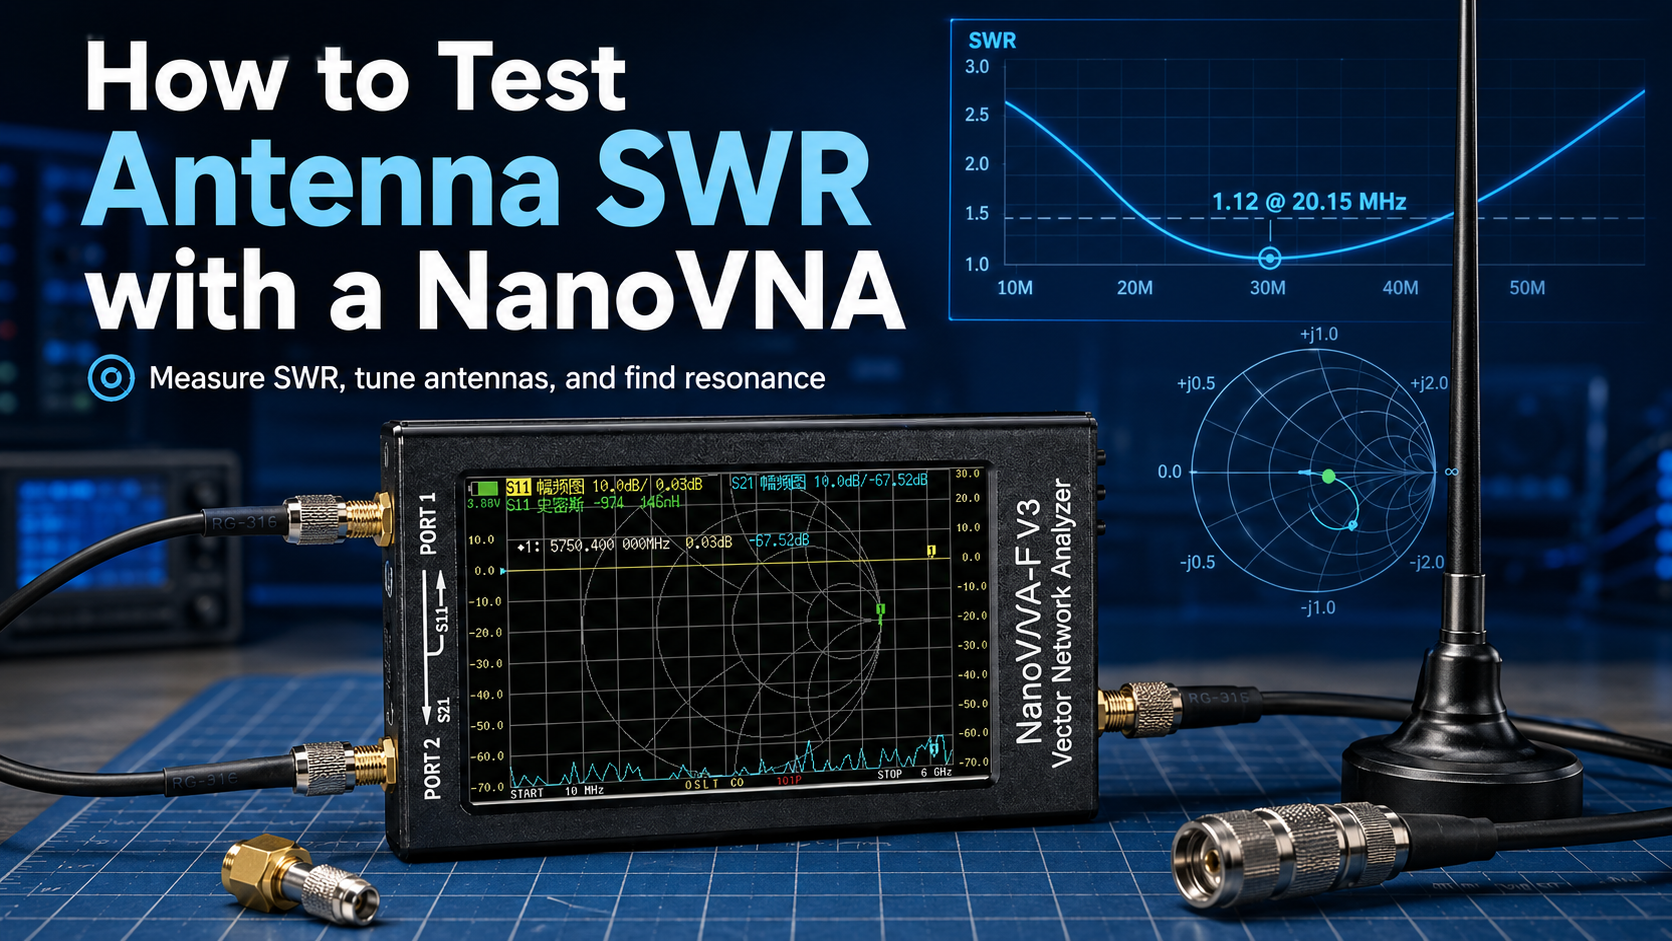
Testing antenna SWR with a NanoVNA is one of the easiest ways to confirm whether an antenna is suitable for your radio project. A properly calibrated NanoVNA can show where an antenna is resonant, how well it is matched across a frequency range, and whether small adjustments improve or reduce performance.
This is useful for amateur-radio antennas, LoRa and Meshtastic nodes, CB antennas, VHF and UHF handhelds, SDR receive antennas, filters, portable whips, outdoor base stations, and custom RF projects.
However, accurate NanoVNA SWR measurements depend on the setup. You need to select the correct frequency range before calibration, attach the calibration standards at the right reference plane, connect the antenna to CH0, and understand what the SWR curve means.
This step-by-step guide focuses specifically on antenna SWR testing. For a broader introduction covering Smith Charts, filters, cables, and S21 measurements, read our NanoVNA Setup Guide: Calibration, SWR, Smith Chart, and Antenna Testing.
Quick Answer: How Do You Test Antenna SWR with a NanoVNA?
- Disconnect the antenna from any transmitter, radio, amplifier, or powered device.
- Set the NanoVNA start and stop frequencies around the band you want to measure.
- Attach the exact cable or adapter that will remain in the measurement setup.
- Calibrate CH0 using the Open, Short, and 50-ohm Load standards.
- Set a CH0 trace to
SWR. - Connect the antenna to CH0, also called Port 1.
- Enable a marker and move it to the lowest point of the SWR curve.
- Read the frequency and SWR value.
- Adjust the antenna in small steps if the resonance is too high or too low.
- Repeat the measurement in the antenna's final installed position.
For most antenna tests, you only need CH0, Open, Short, Load, an SWR trace, and a marker.
What Is SWR?
SWR means Standing Wave Ratio. It describes how well the antenna system is matched to the expected impedance of the radio system, normally 50 ohms.
When an antenna is poorly matched, part of the transmitted RF energy is reflected back toward the source instead of being delivered efficiently to the antenna.
An SWR reading close to 1:1 indicates a good match. Higher readings indicate a larger mismatch.
| SWR Reading | General Interpretation | Recommended Action |
|---|---|---|
| 1.0:1 | Ideal theoretical match | No adjustment required |
| 1.0:1 to 1.5:1 | Very good antenna match | Suitable for most normal radio projects |
| 1.5:1 to 2.0:1 | Often usable depending on the radio and project | Consider tuning if improvement is practical |
| 2.0:1 to 3.0:1 | Noticeable mismatch | Check antenna length, installation, connectors, cable, and matching network |
| Above 3.0:1 | Poor match for many transmitting applications | Investigate the setup before transmitting |
These values are general guidance. Always check the documentation for your radio, amplifier, LoRa module, or transmitter before operating it.
What Is a NanoVNA?
NanoVNA is a compact vector network analyzer. Unlike a basic SWR meter, it can sweep across a frequency range and display how an antenna behaves at many frequencies.
A NanoVNA can help you measure:
- Antenna SWR
- Resonant frequency
- Impedance
- Resistance
- Reactance
- Return loss
- Smith Chart position
- Usable antenna bandwidth
- Filter response
- Cable loss and reflections
For a simple antenna SWR test, the NanoVNA sends a controlled RF signal through CH0 and measures how much energy is reflected by the antenna system.
Which NanoVNA Port Should You Use for SWR?
Connect the antenna to CH0, also called Port 1, TX, Reflect, or S11 depending on the NanoVNA model.
| Port | Common Labels | Measurement Type | Use It For |
|---|---|---|---|
| CH0 | Port 1, TX, Reflect, S11 | Reflection measurement | Antenna SWR, impedance, return loss, and Smith Chart testing |
| CH1 | Port 2, RX, Through, S21 | Transmission measurement | Filters, attenuators, cables, and components connected between CH0 and CH1 |
You do not normally need CH1 to test antenna SWR.
Safety First: Disconnect the Antenna from Every Transmitter
A NanoVNA is sensitive test equipment. Do not connect its ports to an active transmitter or any cable carrying unknown RF power.
Before starting:
- Disconnect the antenna from all radios.
- Turn off amplifiers and active RF equipment.
- Disable bias-tee power unless your exact test requires it.
- Safely discharge static from outdoor antenna feedlines.
- Do not connect an unknown RF source to the NanoVNA input.
- Avoid overtightening SMA connectors.
Outdoor antennas can accumulate static charge from weather and wind. Handle outdoor feedlines carefully before connecting sensitive instruments.
What Do You Need to Measure Antenna SWR?
| Item | Purpose |
|---|---|
| NanoVNA or LiteVNA | Measures reflected RF energy across the selected frequency span |
| Open calibration standard | Creates an open-circuit reference |
| Short calibration standard | Creates a short-circuit reference |
| 50-ohm Load calibration standard | Creates the matched-load reference |
| Antenna under test | The antenna, feedline, or installed antenna system you want to measure |
| Suitable SMA adapters | Connect the antenna or feedline to the NanoVNA without forcing incompatible connectors |
| Optional short coax jumper | Makes the measurement easier when the NanoVNA cannot connect directly to the antenna |
Use the shortest practical cable and avoid unnecessary adapters. Every additional connector can affect the measurement, especially at higher frequencies.
The Most Important Rule: Set the Frequency Span Before Calibration
Select the start and stop frequencies before performing the Open, Short, and Load calibration.
Calibration is tied to the sweep range. If you calibrate from 100 MHz to 200 MHz and later change the sweep to 800 MHz–950 MHz, recalibrate before trusting the new measurements.
Recommended workflow
- Start with a broad sweep to locate the antenna resonance.
- Perform an Open, Short, and Load calibration for that range.
- Connect the antenna and find the approximate SWR dip.
- Narrow the sweep around the actual operating band.
- Recalibrate for the narrower frequency range.
- Make final antenna adjustments using the more detailed graph.
A narrow sweep makes small frequency changes easier to see.
Step 1: Choose the Start and Stop Frequencies
Choose a sweep wide enough to cover the frequencies you want to use.
| Project | Example Sweep Range | Purpose |
|---|---|---|
| EU_868 LoRa or Meshtastic antenna | Approximately 830–900 MHz for the first scan | Locate the antenna dip before narrowing the sweep |
| US 915 MHz LoRa or Meshtastic antenna | Approximately 880–950 MHz for the first scan | Check whether the antenna is resonant near the intended band |
| 2-meter amateur-radio antenna | Approximately 140–150 MHz | Inspect SWR around the VHF operating band |
| 70-centimeter amateur-radio antenna | Approximately 420–450 MHz | Inspect the UHF antenna response |
| CB antenna | Approximately 26–28 MHz | Check the antenna around the CB radio band |
| Wi-Fi antenna | Choose the relevant 2.4 GHz or 5 GHz range | Requires a NanoVNA model that covers the intended frequency |
These are example starting points rather than mandatory settings. Choose a sweep that makes sense for your antenna and local radio system.
Step 2: Decide Where the Measurement Should Start
Calibration defines the reference plane: the point where the NanoVNA considers the measurement to begin.
This decision matters when your antenna uses a cable, adapter, bulkhead connector, enclosure, or feedline.
| Your Goal | Where to Calibrate | What the Result Shows |
|---|---|---|
| Measure a portable antenna directly | At the NanoVNA CH0 connector or attached adapter | The antenna connected directly to the test instrument |
| Measure an antenna using a short test cable | At the far end of the test cable | The antenna response with the test cable largely removed from the result |
| Measure only the antenna at the top of a feedline | At the antenna end of the feedline before installation | The antenna response without the long cable masking the mismatch |
| Measure the full installed antenna system as the radio sees it | At the radio end of the feedline | The combined antenna, feedline, connectors, and adapters |
If you calibrate at the end of a cable, keep that exact cable attached during the antenna measurement. Adding or removing an adapter after calibration changes the reference plane.
Step 3: Perform Open, Short, and Load Calibration
Antenna SWR testing uses a one-port calibration on CH0.
Your NanoVNA menu order may vary slightly depending on the model and firmware. Follow the sequence shown on your device.
Calibration steps
- Set the start and stop frequencies.
- Attach the exact adapter or test cable that will remain connected.
- Open the calibration menu.
- Reset or clear the previous calibration if required.
- Connect the Open standard at the reference plane and select
Open. - Remove the Open standard.
- Connect the Short standard and select
Short. - Remove the Short standard.
- Connect the 50-ohm Load standard and select
Load. - Remove the Load standard.
- Select
DoneorFinish. - Save the calibration to an available memory slot if you plan to reuse it.
Do not rush the process. Check that the correct calibration standard is attached before selecting each option.
Do You Need Through Calibration for Antenna SWR?
No. Through calibration is not normally required for a simple antenna SWR test.
Through calibration is used when measuring how a signal passes from CH0 to CH1 through a cable, filter, attenuator, or RF component. This is called an S21 transmission measurement.
| Measurement | Calibration Standards Normally Used |
|---|---|
| Antenna SWR on CH0 | Open, Short, and Load |
| Antenna impedance and Smith Chart on CH0 | Open, Short, and Load |
| Filter or cable insertion-loss test between CH0 and CH1 | Open, Short, Load, and Through as required |
Step 4: Verify That Calibration Worked
Before attaching the antenna, use the Smith Chart to verify the calibration standards.
| Standard Connected | Expected Smith Chart Position |
|---|---|
| Open | Near the far-right side |
| Short | Near the far-left side |
| 50-ohm Load | Near the center |
If the Load standard is far from the center or the chart behaves unexpectedly, reset the calibration and repeat the process carefully.
Step 5: Set the NanoVNA Trace to SWR
Configure one trace to display CH0 reflection data in SWR format.
Basic trace configuration
- Open the Trace menu.
- Select an active trace, such as Trace 0.
- Select CH0 or S11 reflection measurement.
- Open the Format menu.
- Select
SWR.
You should now see an SWR graph across your selected frequency span.
Optional second trace
Add a Smith Chart trace if you want more detail:
- Trace 0: CH0 SWR
- Trace 1: CH0 Smith Chart
Beginners can start with SWR only. The Smith Chart becomes useful when you want to understand why an antenna is mismatched.
Step 6: Connect the Antenna to CH0
Remove the calibration Load and connect the antenna to CH0.
The SWR trace should change immediately. Look for the lowest point of the curve. This is the SWR dip.
The dip shows the frequency where the antenna system is best matched within the selected sweep range.
Step 7: Enable a Marker and Find the Lowest SWR Point
A marker helps you read the exact frequency and SWR value.
- Open the Marker menu.
- Enable Marker 1.
- Move the marker along the SWR trace.
- Place it at the lowest point of the dip.
- Read the frequency and SWR value.
- Use an automatic minimum-search option if your NanoVNA model supports it.
Check the full band rather than only one frequency. An antenna may be well matched at the center but poor near the edges.
How to Interpret the SWR Curve
| What You See | Likely Meaning | Typical Next Step |
|---|---|---|
| Low SWR dip near the target frequency | Antenna is reasonably well matched | Check the full operating band and final installed position |
| SWR dip below the target frequency | Antenna element is generally too long | Shorten the adjustable element slightly |
| SWR dip above the target frequency | Antenna element is generally too short | Lengthen the adjustable element slightly |
| Dip is near the target but SWR remains high | Resonance may be close, but impedance is not matched properly | Check ground plane, counterpoise, feed point, cable, connectors, enclosure, and matching network |
| No clear dip appears | The sweep may be too narrow, the antenna may be unsuitable, or the connection may be poor | Widen the sweep and inspect the setup |
| Graph changes dramatically when touching the antenna | Your body is affecting the antenna system | Measure the antenna in its final installation and keep your hands away |
How to Tune an Antenna with a NanoVNA
After identifying the SWR dip, compare it with the intended operating frequency.
If the SWR dip is too low in frequency
The antenna element is generally too long. Shorten it in small steps and recheck the graph.
If the SWR dip is too high in frequency
The antenna element is generally too short. Lengthen it gradually and measure again.
If the SWR remains high at the correct frequency
Antenna length may not be the only problem. Investigate:
- The antenna ground plane
- The counterpoise
- The feed-point position
- The matching network
- Connector damage
- Incorrect adapters
- Cable loss
- The enclosure
- Nearby metal objects
- The final mounting surface
Best tuning practices
- Make small adjustments.
- Measure again after every adjustment.
- Do not cut too much antenna length at once.
- Test the antenna in its normal orientation.
- Keep your hands away during the final measurement.
- Check the complete operating band before finishing.
- Prioritize useful bandwidth rather than chasing a perfect number at one frequency.
Example: Testing a Meshtastic or LoRa Antenna
NanoVNA SWR measurements are extremely useful for Meshtastic and LoRa antennas. A poor antenna can reduce range dramatically, even when the radio board and firmware are working correctly.
EU_868 example workflow
- Attach the antenna to the same enclosure or mounting position used by the Meshtastic node.
- Set a first sweep around the intended 868 MHz range.
- Attach the exact test adapter or cable.
- Calibrate with Open, Short, and Load at the reference plane.
- Connect the antenna to CH0.
- Set the trace to SWR.
- Enable a marker and locate the minimum.
- Confirm that the antenna is matched appropriately near the intended operating frequency.
- Repeat the test after installing the antenna on the final node enclosure.
US 915 MHz example workflow
The process is the same for a 915 MHz Meshtastic setup. Select a sweep that covers the intended frequency range, calibrate at the correct reference plane, and verify the antenna in the final installation.
Read our full guide: Meshtastic Range Guide: How Far Can LoRa Mesh Nodes Really Reach?.
Example: Testing a VHF Antenna Around 145 MHz
- Set Start to approximately 140 MHz.
- Set Stop to approximately 150 MHz.
- Attach the same adapter or test cable you plan to use.
- Perform Open, Short, and Load calibration.
- Set Trace 0 to CH0 SWR.
- Connect the antenna.
- Enable a marker.
- Move the marker to the lowest SWR point.
- Check whether the dip is below, above, or near your intended frequency.
- Adjust the antenna gradually if required.
Measure handheld antennas in a realistic position. Their response may change when mounted on a radio, connected through an adapter, placed near your body, or installed on a vehicle.
Example: Testing a CB Antenna
A NanoVNA is also useful for CB antenna adjustment.
- Set the sweep around the CB radio band.
- Calibrate at the radio end of the installed feedline if you want to test the complete system.
- Connect the antenna cable to CH0.
- Find the SWR minimum.
- Check the SWR near the lower, middle, and upper part of the operating range.
- Adjust the antenna according to the manufacturer's instructions.
- Repeat until the antenna is suitable across the required channels.
Do not transmit until the antenna system has been checked against your radio's requirements.
Antenna Resonance and Good SWR Are Not Identical
An antenna can be resonant without being matched perfectly to 50 ohms.
Resonance means the reactance is close to zero. A good impedance match means the resistance and reactance are both appropriate for the radio system, commonly close to 50 + j0 ohms.
An antenna may be resonant but still show a high SWR if its resistance is far from 50 ohms.
SWR tells you whether there is a mismatch. The Smith Chart helps explain the type of mismatch.
Smith Chart Basics for SWR Testing
| Smith Chart Area | General Meaning |
|---|---|
| Center | Approximately 50 + j0 ohms on a normal 50-ohm system |
| Upper half | Inductive reactance |
| Lower half | Capacitive reactance |
| Left side | Lower resistance region |
| Right side | Higher resistance region |
For a simple antenna tune, place a marker at the intended operating frequency and observe how close the point is to the center.
Should You Measure the Antenna or the Entire Feedline System?
Both measurements are useful, but they answer different questions.
Measure the antenna alone when:
- You want to tune the antenna itself.
- You are comparing multiple antennas.
- You want to remove feedline effects from the result.
- You are testing a portable whip directly.
Measure the complete installed system when:
- You want to see what the radio experiences.
- You want to include connectors, cables, adapters, and installation effects.
- You are troubleshooting a fixed outdoor antenna.
- You suspect cable or connector damage.
A lossy cable can make the SWR at the radio end appear better than the true antenna match because some reflected energy is lost before it returns to the analyzer. Test thoughtfully when long feedlines are involved.
How to Measure Antenna Bandwidth
Antenna bandwidth is the frequency range over which the SWR remains below a chosen threshold.
For example, you may want to identify the frequencies where the SWR remains below 2.0:1.
Bandwidth measurement workflow
- Set a sweep that covers the entire expected antenna response.
- Calibrate the NanoVNA.
- Connect the antenna.
- Set the trace to SWR.
- Use markers to identify the lower and upper frequencies where the SWR crosses your chosen threshold.
- Calculate the difference between the upper and lower frequency.
A very narrow low-SWR dip may not be useful if your project needs reliable operation across a wider band.
Can You Use NanoVNA-Saver on a Computer?
Yes. Desktop software such as NanoVNA-Saver can make detailed measurements easier to analyze.
Desktop software can help you:
- View larger SWR graphs
- Use multiple traces
- Inspect Smith Charts in more detail
- Display markers more clearly
- Run multi-segment sweeps
- Increase effective measurement resolution
- Save screenshots
- Export Touchstone files
- Compare antennas
- Document changes after tuning
Use a USB data cable rather than a charging-only cable.
Common NanoVNA SWR Problems and Fixes
The SWR graph is almost completely flat
Confirm that the trace is set to CH0 reflection and SWR format. Check that the antenna is connected to CH0 rather than CH1.
The SWR appears unrealistically perfect across a huge frequency range
Check whether the 50-ohm Load standard is still connected. Confirm the active trace, cable, antenna connection, and calibration state.
The SWR reading changes after adding an adapter
Recalibrate with the adapter included in the measurement setup. Adding an adapter changes the reference plane.
The SWR reading changes after changing the sweep range
Recalibrate. The previous calibration may not be valid for the new range.
The result changes when touching the antenna
This is common with small portable antennas. Your body changes the RF environment. Test the antenna in the intended installation and keep your hands away during the final measurement.
The antenna shows good SWR but poor real-world range
Low SWR does not automatically guarantee high gain, good efficiency, or good placement. Check antenna design, height, mounting position, ground plane, enclosure, cable loss, and surrounding objects.
No SWR dip appears
Widen the sweep. Confirm that the antenna is connected correctly and that it is designed for the intended frequency range.
The Smith Chart looks wrong after calibration
Repeat the calibration carefully. Confirm that Open, Short, and Load standards were attached at the correct time and at the exact reference plane.
The NanoVNA is not detected by the computer
Replace the USB cable with a known-good data cable. Check the correct port, operating-system permissions, and software connection settings.
NanoVNA vs TinySA: Which Tool Tests SWR?
NanoVNA is the correct tool for testing antenna SWR.
tinySA is a spectrum analyzer. It is useful for seeing which signals are present and identifying interference, but it is not the normal tool for direct SWR, impedance, return-loss, and Smith Chart measurements.
Read the full comparison: NanoVNA vs TinySA: Which RF Tool Do You Actually Need?.
Which NanoVNA Should You Buy for Antenna SWR Testing?
| Model | Listed Frequency Range | Best For |
|---|---|---|
| NanoVNA-H4 | 10 kHz–1.5 GHz | HF, VHF, UHF, CB, LoRa, Meshtastic, amateur radio, and general antenna testing |
| NanoVNA-F V3 | 1 MHz–6 GHz | Wider-frequency antenna, cable, and filter testing, including Wi-Fi, Bluetooth, and GPS projects |
| LiteVNA-64 | 50 kHz–6.3 GHz | Users who want a wider-range NanoVNA-style analyzer with a touchscreen and MicroSD storage |
Choose NanoVNA-H4 if:
- Your projects remain below 1.5 GHz.
- You want a practical first antenna analyzer.
- You test LoRa and Meshtastic antennas at 433 MHz, 868 MHz, or 915 MHz.
- You work with HF, VHF, UHF, or CB antennas.
Choose NanoVNA-F V3 or LiteVNA-64 if:
- You need measurements up to approximately 6 GHz.
- You test Wi-Fi, Bluetooth, GPS, or higher-frequency antennas.
- You want broader filter and cable measurements.
- You need a wider-frequency RF toolkit.
Where to Browse NanoVNA and RF Testing Equipment
- Spectrum analyzers and RF analysis tools
- NanoVNA-H4 10 kHz–1.5 GHz portable vector network analyzer
- NanoVNA-F V3 1 MHz–6 GHz portable vector network analyzer
- LiteVNA-64 50 kHz–6.3 GHz vector network analyzer
- Antennas and RF accessories
- Software-defined radio equipment
Final Recommendation
Testing antenna SWR with a NanoVNA becomes straightforward once you follow the correct order.
Set the frequency range first. Attach the exact cable or adapter that will remain in the measurement setup. Calibrate CH0 using Open, Short, and Load standards at the correct reference plane. Set the trace to SWR. Connect the antenna. Use a marker to locate the minimum SWR value.
If the SWR dip is below the target frequency, the antenna element is generally too long. If the dip is above the target frequency, it is generally too short. Make small adjustments and test again.
Remember that low SWR does not automatically guarantee excellent range or antenna efficiency. Measure the antenna in its final installed position and consider height, cable loss, ground plane, enclosure, and nearby objects.
The most important rule is simple: calibration is not optional. A carefully calibrated NanoVNA turns antenna tuning from guesswork into a repeatable measurement process.
FAQ
How do you test antenna SWR with a NanoVNA?
Set the start and stop frequencies, calibrate CH0 using Open, Short, and Load standards, set a CH0 trace to SWR, connect the antenna to CH0, and use a marker to locate the lowest SWR point.
Which NanoVNA port should I use for SWR?
Use CH0, also called Port 1, TX, Reflect, or S11. CH1 is mainly used for transmission measurements through filters, cables, and other RF components.
Do I need to calibrate a NanoVNA before testing SWR?
Yes. Select the frequency span first, then calibrate using Open, Short, and Load standards at the correct reference plane.
Do I need Through calibration for antenna SWR?
No. A normal one-port antenna SWR test uses Open, Short, and Load calibration on CH0. Through calibration is used for S21 measurements between CH0 and CH1.
What is a good antenna SWR?
An SWR close to 1:1 is ideal. Values below around 1.5:1 are generally very good, while values between 1.5:1 and 2.0:1 are often acceptable depending on the radio and project.
What does an SWR dip mean?
The SWR dip shows the frequency where the antenna system is best matched within the selected sweep range.
If the SWR dip is too low, should I shorten the antenna?
Yes. If the SWR dip is below your intended operating frequency, the adjustable antenna element is generally too long. Shorten it in small steps and measure again.
If the SWR dip is too high, should I lengthen the antenna?
Yes. If the SWR dip is above the intended operating frequency, the adjustable antenna element is generally too short. Lengthen it gradually and measure again.
Why does SWR change when I touch the antenna?
Your body changes the RF environment. Test the antenna in its final installation position and keep your hands away during the final reading.
Why does SWR change after adding an adapter?
Adding an adapter changes the reference plane and can affect the measurement. Recalibrate with the exact adapter arrangement you plan to use.
Should I test the antenna alone or the entire feedline?
Test the antenna alone when tuning the antenna itself. Test the complete installed system at the radio end when you want to include the cable, connectors, adapters, and installation effects.
Can a NanoVNA test LoRa and Meshtastic antennas?
Yes. A suitable NanoVNA can test common 433 MHz, 868 MHz, and 915 MHz LoRa and Meshtastic antennas. Use the correct frequency range and measure the antenna in its final enclosure or installation.
Can a NanoVNA test Wi-Fi antennas?
Yes, when the NanoVNA model covers the required Wi-Fi frequency. Choose a wider-range model such as NanoVNA-F V3 or LiteVNA-64 for higher-frequency projects.
Is a NanoVNA better than tinySA for SWR?
Yes. NanoVNA is the correct tool for direct SWR, impedance, return-loss, and Smith Chart measurements. tinySA is a spectrum analyzer for observing RF signals and interference.
Does low SWR guarantee good antenna range?
No. Low SWR shows that the antenna system is matched reasonably well, but real-world range also depends on antenna efficiency, gain, height, placement, cable loss, ground plane, enclosure, terrain, and obstacles.
Which NanoVNA should I buy for basic antenna SWR testing?
NanoVNA-H4 is a practical option for HF, VHF, UHF, LoRa, Meshtastic, CB, and general antenna testing below 1.5 GHz. Choose a wider-range model when you need measurements up to approximately 6 GHz.
No posts found
Write a review
We support all major card and digital payment options. More local methods are available and shown during checkout.
You enter into a binding sales contract once you have received an 'order confirmation and sales receipt' email from us, in line with our Sales & Delivery conditions. Therefore, sdrstore.eu has the right to cancel your order in the event of technical problems, delivery failure, Fair use policy and other similar situations.
Your payments are protected by advanced encryption and 3-D Secure authentication for safe online shopping.