
bladeRF 2.0 micro Setup Guide: Drivers, libbladeRF, FPGA Image, and GNU Radio
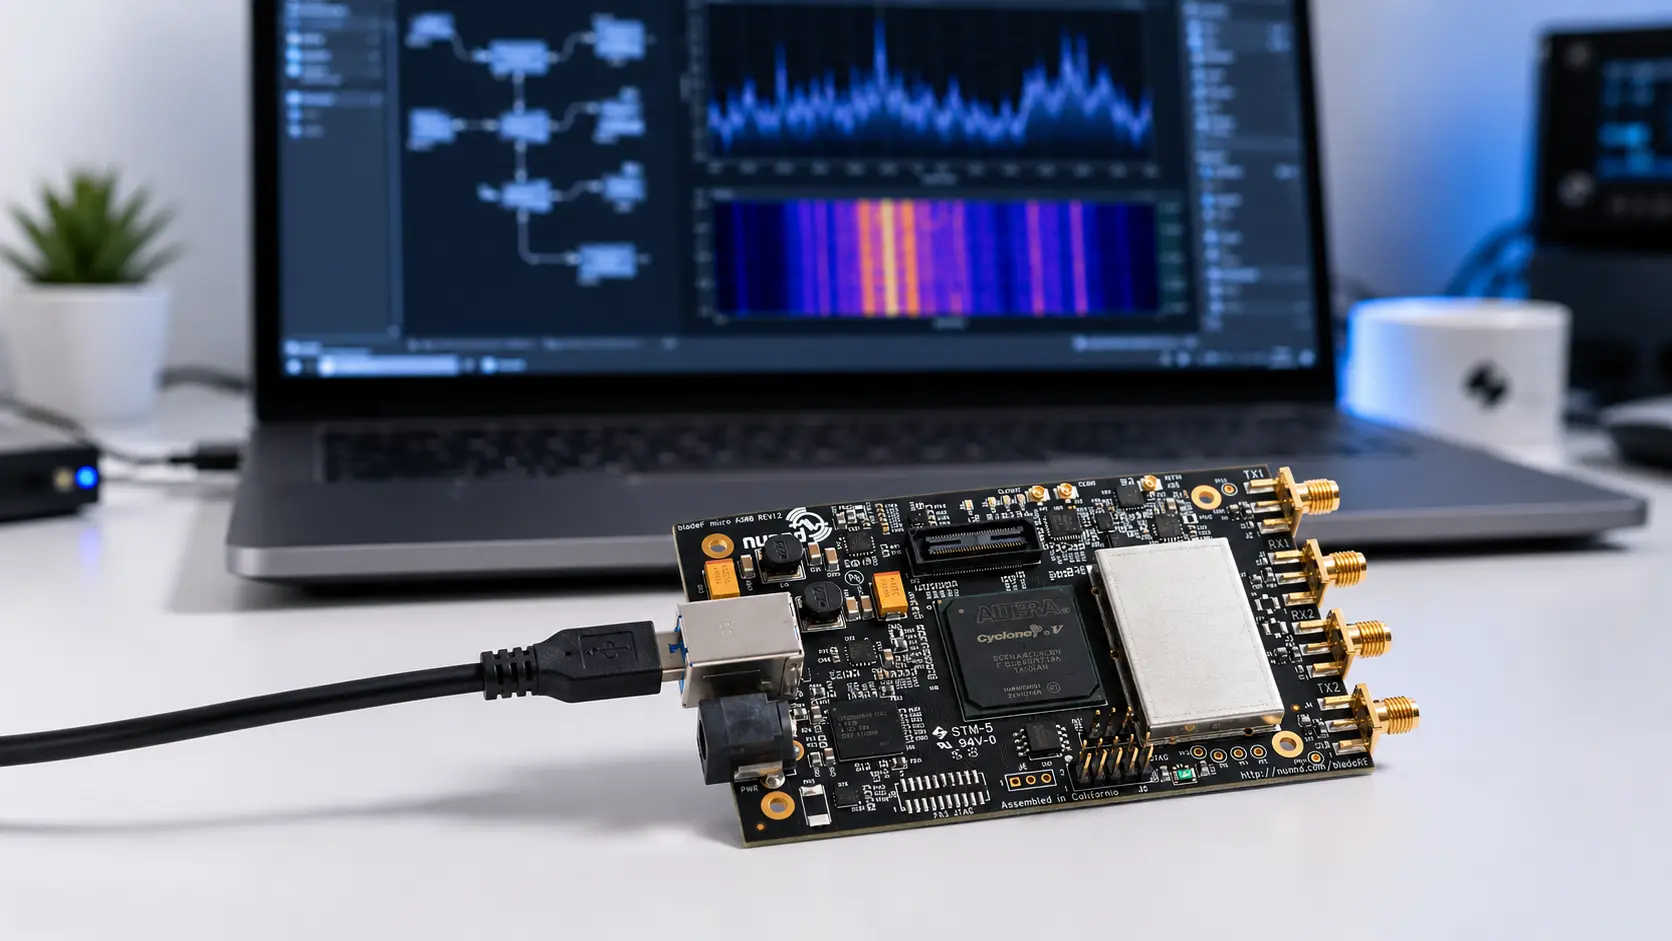
bladeRF 2.0 micro is a powerful 2×2 MIMO software-defined radio for GNU Radio projects, custom waveform development, wireless research, FPGA experimentation, university labs, and RF engineering. Before you can use it reliably, you need the correct drivers, libbladeRF, bladeRF-cli, firmware checks, and FPGA image setup.
This setup guide covers bladeRF 2.0 micro xA4 and xA9 on Linux, Windows, and macOS. It also explains how to verify the board, load the correct FPGA image, connect it to GNU Radio, and avoid the most common installation mistakes.
Browse the bladeRF SDR devices and accessories category, the bladeRF 2.0 micro xA4, and the bladeRF 2.0 micro xA9.
Quick Setup Overview
| Step | What to install or check | Why it matters |
|---|---|---|
| 1. Identify the board | bladeRF 2.0 micro xA4 or xA9 | The FPGA image must match the board variant. |
| 2. Install drivers and tools | libbladeRF, bladeRF-cli, USB driver or udev rules | The host computer must detect and control the SDR correctly. |
| 3. Check firmware | FX3 firmware version | Firmware controls the USB 3.0 peripheral controller. |
| 4. Load FPGA image | Hosted xA4 or hosted xA9 FPGA bitstream | The FPGA must be configured before normal SDR operation. |
| 5. Verify basic operation | bladeRF-cli version, info, and print commands | Confirms that the board, driver, firmware, and FPGA are working. |
| 6. Install GNU Radio support | gr-osmosdr or SoapySDR workflow | Allows bladeRF to be used in GNU Radio Companion and flowgraphs. |
| 7. Test a simple receive flowgraph | Known frequency, safe gain, suitable antenna | Validates the setup before complex TX, MIMO, or FPGA work. |
What You Need Before Starting
Before installing software, prepare the hardware and host system.
- bladeRF 2.0 micro xA4 or xA9
- Reliable USB 3.0 port
- High-quality USB 3.0 cable
- Linux, Windows, or macOS host computer
- Suitable antenna for receive-only testing
- Fixed attenuators and dummy loads for transmit testing
- Internet access for packages, firmware, and FPGA images
- Administrative access on the computer
For most research users, Linux is the easiest environment for GNU Radio work. Windows is practical for bladeRF-cli, SDR applications, and MATLAB/Simulink workflows. macOS can work, but some SDR software packages may require additional build steps or package-manager setup.
Understand the bladeRF Software Stack
The bladeRF setup has several layers. Knowing which layer is failing makes troubleshooting much easier.
| Layer | Component | Purpose |
|---|---|---|
| USB driver or permissions | Windows driver or Linux udev rules | Allows the operating system to access the bladeRF device. |
| Host library | libbladeRF | Main low-level API used by bladeRF applications. |
| Command-line tool | bladeRF-cli | Used to inspect the board, load FPGA images, flash firmware, and test operation. |
| USB firmware | FX3 firmware | Runs on the USB 3.0 controller. |
| FPGA image | Hosted xA4 or hosted xA9 bitstream | Configures the FPGA for normal host-connected SDR operation. |
| SDR application layer | GNU Radio, GQRX, SDR Console, SDR#, MATLAB, or custom code | Uses libbladeRF directly or through a wrapper to stream samples. |
bladeRF xA4 vs xA9 Setup Difference
The setup process is almost identical for xA4 and xA9. The most important difference is the FPGA image.
| Board | FPGA package or image direction | Important note |
|---|---|---|
| bladeRF 2.0 micro xA4 | hosted xA4 FPGA image | Use the xA4 image, not the xA9 image. |
| bladeRF 2.0 micro xA9 | hosted xA9 FPGA image | Use the xA9 image because the FPGA size is different. |
If you are deciding which model to buy before setup, read bladeRF 2.0 micro xA4 vs xA9: Which SDR Should You Buy?
Recommended Linux Setup on Ubuntu
For Ubuntu 20.04 or later, Nuand provides a PPA. This is the simplest route for many users because it installs bladeRF tools without building everything from source.
1. Add the Nuand PPA
sudo add-apt-repository ppa:nuandllc/bladerf
sudo apt-get update
2. Install bladeRF tools
sudo apt-get install bladerfThis installs the main bladeRF command-line tools, including bladeRF-cli.
3. Install development headers if needed
If you plan to build GNU Radio support, gr-osmosdr, SoapySDR modules, or your own software using libbladeRF, install the development package:
sudo apt-get install libbladerf-dev4. Install firmware and the correct FPGA image
Install the firmware package:
sudo apt-get install bladerf-firmware-fx3For bladeRF 2.0 micro xA4:
sudo apt-get install bladerf-fpga-hostedxa4For bladeRF 2.0 micro xA9:
sudo apt-get install bladerf-fpga-hostedxa9You can install both xA4 and xA9 FPGA packages on the same workstation if your lab uses both models. The board still needs the correct image for its FPGA size.
5. Fix Linux permissions if the board is not accessible
If bladeRF-cli can see the device only with sudo, the issue is usually USB permissions or udev rules. Install the udev rules through the package or source build, then unplug and reconnect the device. Logging out and back in may also be required if your user was added to a new group.
Build libbladeRF from Source on Linux
Use a source build when you need the newest features, a specific release, or a custom development environment.
1. Install dependencies
sudo apt-get install libusb-1.0-0-dev libusb-1.0-0 build-essential cmake libncurses5-dev libedit-dev pkg-config git wget libcurl4-openssl-dev2. Clone the official repository
git clone https://github.com/Nuand/bladeRF.git ./bladeRF
cd ./bladeRF
3. Build the host tools
cd host
mkdir build
cd build
cmake -DCMAKE_BUILD_TYPE=Release -DCMAKE_INSTALL_PREFIX=/usr/local -DINSTALL_UDEV_RULES=ON ../
make
sudo make install
sudo ldconfig
4. Reconnect the device
After installing udev rules, unplug the bladeRF, reconnect it, and test without sudo:
bladeRF-cli -pIf the device is still not accessible, check your user groups and udev configuration before continuing.
Windows Setup
On Windows, the official installer is normally the easiest method. Nuand’s Windows installer includes libbladeRF, bladeRF-cli, drivers, and MATLAB/Simulink support.
Recommended Windows steps
- Download the current official bladeRF Windows installer from Nuand or the official Nuand GitHub release page.
- Run the installer as administrator.
- Connect the bladeRF to a USB 3.0 port.
- Open Command Prompt or the installed bladeRF-cli shortcut.
- Run a basic probe command.
bladeRF-cli -pThen open interactive mode:
bladeRF-cli -iInside bladeRF-cli, run:
version
info
Windows driver troubleshooting
- Use a direct USB 3.0 port rather than an unreliable hub.
- Check Device Manager if the board is not detected.
- Reinstall the official Nuand installer if the driver is missing.
- Avoid mixing old manual drivers with the current installer unless you know why.
- Restart the PC after driver installation if the device is not visible.
macOS Setup
macOS users can build bladeRF tools from source using a package manager such as Homebrew or MacPorts. The exact dependency versions can change, so use Nuand’s current macOS guide as the authority when setting up a production machine.
General macOS workflow
- Install Apple’s command-line tools or Xcode.
- Install a package manager such as Homebrew or MacPorts.
- Install build dependencies such as CMake, libusb, git, and related libraries.
- Clone the official Nuand bladeRF repository.
- Build and install libbladeRF and bladeRF-cli.
- Verify the board using bladeRF-cli.
For GNU Radio on macOS, installation complexity depends on the GNU Radio version, package source, Python environment, and SDR support modules. Test bladeRF-cli first before debugging GNU Radio.
Verify Basic bladeRF Operation
After installing the driver and tools, verify the board before opening GNU Radio.
1. Probe connected devices
bladeRF-cli -pThis should list the connected bladeRF device. If nothing appears, check USB, drivers, permissions, and cable quality.
2. Start interactive mode
bladeRF-cli -i3. Check software, firmware, and FPGA status
Inside bladeRF-cli:
version
info
Look for:
- bladeRF-cli version
- libbladeRF version
- Firmware version
- FPGA size
- FPGA loaded or not loaded
- USB speed
- Serial number
If the FPGA version shows as unknown or not loaded, load the FPGA image before continuing.
Load the Correct FPGA Image
The bladeRF FPGA must be configured before normal SDR use. On Linux with the correct FPGA package installed, libbladeRF may automatically load the FPGA image when the device opens. You can also load it manually.
Manual FPGA load command
bladeRF-cli -l /path/to/hostedxA4_or_hostedxA9.rbfOr from interactive mode:
load fpga /path/to/hostedxA4_or_hostedxA9.rbfChoose the right FPGA image
| Device | Correct image | Wrong image risk |
|---|---|---|
| bladeRF 2.0 micro xA4 | hosted xA4 | The wrong image will not give a valid setup. |
| bladeRF 2.0 micro xA9 | hosted xA9 | The FPGA size and resources are different. |
After loading the FPGA, run:
bladeRF-cli -e version -e infoConfirm that the FPGA is loaded and the board is operating over the expected USB connection.
Should You Update the FX3 Firmware?
Do not flash firmware casually. If the device is working and your installed software stack matches your project, firmware updates are not always necessary. Update when Nuand documentation, a release note, or a support case indicates that your firmware should be upgraded.
Linux firmware package path example
If you installed the firmware package from Nuand’s PPA, the firmware image may be installed under the Nuand bladeRF system directory. Nuand’s Linux guide describes flashing firmware with a command similar to:
sudo bladeRF-cli --flash-firmware /usr/share/Nuand/bladeRF/bladeRF_fw.imgAfter flashing firmware, power-cycle or reconnect the board and verify the version again:
bladeRF-cli -e version -e infoFirmware update precautions
- Use only official Nuand firmware images.
- Do not disconnect the board during flashing.
- Use a stable USB port and cable.
- Match firmware, libbladeRF, and FPGA versions where release notes require it.
- Record the old version before updating.
Install GNU Radio Support for bladeRF
bladeRF can be used with GNU Radio through compatible integrations such as gr-osmosdr and SoapySDR workflows. The exact best path depends on your Linux distribution, GNU Radio version, package sources, and project requirements.
Simple Ubuntu package direction
On many systems, users begin by installing GNU Radio and gr-osmosdr from packages:
sudo apt-get install gnuradio gr-osmosdrThen confirm bladeRF itself works:
bladeRF-cli -e version -e infoDo not troubleshoot GNU Radio until bladeRF-cli works correctly.
Device string direction
In GNU Radio Companion, the Osmocom Source or Sink device arguments commonly use a bladeRF direction such as:
bladerf=0Depending on the installed block and wrapper, a SoapySDR workflow may use a driver string such as:
driver=bladerfThe exact string can vary by GNU Radio version, SoapySDR module, and gr-osmosdr build. Validate with a simple receive-only flowgraph first.
First GNU Radio Receive Test
Start with receive-only testing. Do not begin with transmission, MIMO, or custom FPGA work.
Basic receive flowgraph
| Block | Suggested role |
|---|---|
| Osmocom Source or SoapySDR Source | Receive samples from bladeRF |
| Low Pass Filter or Frequency Xlating FIR Filter | Limit the signal of interest |
| QT GUI Frequency Sink | View spectrum |
| QT GUI Waterfall Sink | View signal activity over time |
Conservative starting settings
| Setting | Safe starting direction |
|---|---|
| Sample rate | 1 MSPS to 5 MSPS |
| Frequency | A known local test signal or legal receive-only target |
| Gain | Start low or use automatic gain where suitable |
| Bandwidth | Match the sample rate and signal type |
| Antenna | Use an antenna suitable for the selected receive band |
Why start small?
High sample rates can expose USB, CPU, buffer, driver, or GNU Radio scheduling issues. A simple low-rate receive flowgraph confirms that the driver and SDR path work before you add complexity.
First Transmit Test
Only transmit where you are legally permitted and authorized. For laboratory work, begin with a cabled path, dummy load, or shielded setup rather than an antenna.
Safe active-test checklist
- Use a 50-ohm dummy load when radiation is unnecessary.
- Use fixed attenuators before connecting a receiver input.
- Confirm the expected RF power level.
- Do not connect TX directly to RX without a safe attenuation plan.
- Use a shielded RF enclosure where appropriate.
- Follow national spectrum regulations.
Simple GNU Radio TX test direction
A basic transmit flowgraph normally includes a signal source, scaling block, and SDR sink. Keep amplitude conservative and use a protected RF path.
| Block | Purpose |
|---|---|
| Signal Source | Generate a test tone or simple waveform |
| Multiply Const | Control amplitude |
| Osmocom Sink or SoapySDR Sink | Send samples to bladeRF TX |
| Dummy load or cabled attenuated path | Prevent unintended radiation and protect equipment |
Common Setup Problems and Fixes
bladeRF-cli does not detect the device
- Try a direct USB 3.0 port.
- Replace the USB cable.
- Check Linux permissions or Windows driver status.
- Unplug and reconnect the board.
- Run
bladeRF-cli -p. - On Linux, check
lsusbto see whether the USB device is visible.
Device works only with sudo on Linux
This is usually a udev permission issue. Install udev rules, confirm your user group, reconnect the board, and log out and back in if necessary.
FPGA not loaded
- Install the correct hosted FPGA package for xA4 or xA9.
- Load the FPGA manually with
bladeRF-cli -l. - Check
versionandinfoagain. - Do not use an xA4 image on xA9 or an xA9 image on xA4.
GNU Radio does not show the bladeRF block
- Confirm GNU Radio is installed correctly.
- Confirm gr-osmosdr or SoapySDR support is installed.
- Launch GNU Radio Companion from the same environment where the SDR modules are installed.
- Check Python path issues if you built GNU Radio manually.
- Test with bladeRF-cli before testing GNU Radio.
GNU Radio opens but samples do not stream reliably
- Reduce sample rate.
- Use a direct USB 3.0 port.
- Close other high-USB-bandwidth devices.
- Check CPU usage.
- Use a simpler flowgraph.
- Update libbladeRF only after checking release compatibility.
Signal looks overloaded
- Reduce gain.
- Add attenuation.
- Use filtering.
- Move away from strong local transmitters.
- Avoid unnecessary LNAs.
For LNA planning, read Do You Need an LNA for SDR?
Recommended Accessories for bladeRF Setup
A reliable bladeRF setup needs more than the SDR board.
- Suitable antennas for the intended bands
- Short SMA cables
- SMA adapters
- Fixed attenuators
- 50-ohm dummy loads
- DC blocks where required
- Band-specific filters
- USB 3.0 cable
- Shielded RF enclosure for active tests
- Portable spectrum analyzer for signal checks
Browse antennas, RF test and measurement tools, and dummy loads.
bladeRF Accessories: BT-100, BT-200, and Cases
Nuand lists bladeRF 2.0 micro with software-controlled bias-tee support. SDRstore.eu also lists bladeRF accessories such as BT-100 and BT-200.
| Accessory | Purpose | Buyer note |
|---|---|---|
| BT-100 Bias-Tee TX Power Amplifier | Transmit-side amplification | Use only with proper RF-safety planning, attenuation, and legal authorization. |
| BT-200 Bias-Tee Low Noise Amplifier | Receive-side amplification | Useful for weak-signal work, but can overload the receiver in strong-signal environments. |
| bladeRF case | Physical protection | Recommended for portable labs and university benches. |
Browse current accessories in the bladeRF category.
Suggested Setup Path by User Type
| User type | Recommended setup path |
|---|---|
| Beginner GNU Radio user | Install PPA packages, verify bladeRF-cli, load FPGA automatically, then test a simple receive flowgraph. |
| University lab | Create one validated Linux image, document commands, test every board with bladeRF-cli, then clone the environment. |
| FPGA developer | Start with working hosted FPGA image, then move to Nuand HDL development only after standard operation is stable. |
| Windows user | Use official installer, verify in bladeRF-cli, then test SDR applications or MATLAB/Simulink integration. |
| Research team | Pin the OS, libbladeRF version, FPGA image, firmware version, GNU Radio version, and flowgraph configuration. |
Version Control for a Research Lab
If bladeRF is used in a university or business lab, document the full software environment. This avoids confusion when one workstation works and another does not.
Record:
- Operating system and kernel version
- bladeRF model and serial number
- libbladeRF version
- bladeRF-cli version
- FX3 firmware version
- FPGA image name and version
- GNU Radio version
- gr-osmosdr or SoapySDR version
- USB controller used
- Sample rates tested successfully
- Known-good flowgraph files
This documentation is especially important for MIMO research, automated testing, wireless-security labs, and long-term course material.
Legal and RF-Safety Notes
bladeRF 2.0 micro is a transmit-capable SDR. Use it only on frequencies, devices, systems, and power levels where you are legally permitted and authorized to transmit.
- Start with receive-only testing.
- Use cabled paths for active tests where possible.
- Use suitable attenuators before receiver inputs.
- Use dummy loads when radiation is unnecessary.
- Never connect a transmitter output directly to a sensitive receiver input.
- Verify power levels before connecting test instruments.
- Use shielding where appropriate.
- Follow local spectrum regulations.
- Obtain written authorization before wireless-security testing.
Request a Quote for bladeRF Lab Hardware
Universities, laboratories, cybersecurity firms, telecom teams, engineering departments, integrators, and businesses can request a formal quotation directly from SDRstore.eu.
Use the Add to Quote button on product pages or the document icon on product cards. Add the required bladeRF boards, accessories, antennas, attenuators, cables, dummy loads, test instruments, and quantities to one quote request.
A quote request is useful when you need:
- Multiple bladeRF xA4 or xA9 units
- A complete GNU Radio lab setup
- Formal pricing for university procurement
- Accessories included in the same offer
- A phased SDR lab rollout
- Business or institutional approval documents
Read the SDRstore.eu quote-request guide.
Related SDRstore.eu Guides
- bladeRF 2.0 micro xA4 vs xA9: Which SDR Should You Buy?
- bladeRF 2.0 micro vs USRP B210: Which 2×2 MIMO SDR Is Better for Research?
- bladeRF vs LimeSDR: Which SDR Is Better for MIMO, GNU Radio, and FPGA Development?
- Best SDR for GNU Radio Projects: RTL-SDR, HackRF, PlutoSDR, bladeRF, and USRP
- 2×2 MIMO SDR Explained: USRP B210, PLUTO+, bladeRF, LimeSDR, and Research Use Cases
- RF Cybersecurity Lab Equipment Checklist
Official Resources
- Nuand bladeRF 2.0 micro official overview
- Nuand bladeRF official GitHub repository
- Nuand bladeRF Linux getting-started guide
- Nuand bladeRF Windows getting-started guide
- Nuand bladeRF macOS getting-started guide
- Nuand bladeRF verifying basic device operation
- Nuand bladeRF Windows installers
- Osmocom gr-osmosdr documentation
- GNU Radio official website
Final Recommendation
For most Linux users, start with Nuand’s Ubuntu PPA, install bladeRF tools, install the correct xA4 or xA9 FPGA package, verify the board in bladeRF-cli, and only then install GNU Radio support.
For Windows users, start with Nuand’s official installer, confirm detection in bladeRF-cli, and then test SDR applications or MATLAB/Simulink workflows.
For advanced developers, build libbladeRF from source only after confirming that the basic official setup works. For FPGA development, begin with the standard hosted image before modifying HDL.
The best bladeRF setup is not the one with the most complex toolchain. It is the one that gives you a repeatable, documented, known-good environment for your exact board, operating system, FPGA image, firmware version, GNU Radio version, and research workflow.
FAQ
How do I install bladeRF 2.0 micro on Ubuntu?
Add Nuand’s Ubuntu PPA, install the bladeRF package, install libbladerf-dev if you need development headers, then install the correct FPGA package for xA4 or xA9. After installation, verify the device with bladeRF-cli.
Which FPGA image do I need for bladeRF xA4?
Use the hosted xA4 FPGA image or the package named for hosted xA4. Do not use the xA9 image on an xA4 board.
Which FPGA image do I need for bladeRF xA9?
Use the hosted xA9 FPGA image or the package named for hosted xA9. The xA9 FPGA has a different size and requires the correct image.
How do I check whether bladeRF is detected?
Run bladeRF-cli -p to probe connected devices. Then run bladeRF-cli -i and use the version and info commands to check firmware, FPGA, USB, and device information.
Why does bladeRF-cli show that the FPGA is not loaded?
The FPGA image may not be installed or loaded. Install the correct hosted FPGA package for your board or load the FPGA manually with bladeRF-cli -l followed by the path to the correct image.
Can bladeRF 2.0 micro work with GNU Radio?
Yes. Nuand lists GNU Radio support via gr-osmosdr, and bladeRF can also be used in supported SoapySDR workflows. The exact setup depends on your operating system, GNU Radio version, and installed SDR modules.
Should I update bladeRF firmware immediately?
Not always. If the device works and your software stack is stable, firmware updates are not automatically required. Update when Nuand release notes, documentation, or support guidance indicates that your firmware should be upgraded.
Does bladeRF xA9 require a different setup than xA4?
The setup process is mostly the same, but the FPGA image must match the board. xA4 uses an xA4 image, while xA9 uses an xA9 image.
Why does GNU Radio not see my bladeRF?
First verify that bladeRF-cli works. Then check that GNU Radio, gr-osmosdr or SoapySDR support, Python paths, and device arguments are installed and launched from the same environment.
How can a university request a quote for multiple bladeRF devices?
Use the Add to Quote button on SDRstore.eu product pages or the document icon on product cards. Add the required bladeRF boards, accessories, quantities, and project notes so the full setup can be reviewed as one quotation request.
No posts found
Write a review
We support all major card and digital payment options. More local methods are available and shown during checkout.
You enter into a binding sales contract once you have received an 'order confirmation and sales receipt' email from us, in line with our Sales & Delivery conditions. Therefore, sdrstore.eu has the right to cancel your order in the event of technical problems, delivery failure, Fair use policy and other similar situations.
Your payments are protected by advanced encryption and 3-D Secure authentication for safe online shopping.